

Maine Fly Fish
Welcome back to another blog post from the Educated Angler. This blog is intended to help out newcomers to fly fishing and can be helpful for seasoned anglers to revisit some old skills or learn something new. Go check out our other posts in the Blogs section on the homepage!
This post is all about nymphing! I could probably write 20 pages on nymphing, but I’m going to try keep this as short as possible.
Many people see fly fishing as this sport with finesse, beauty and precision. However, in recent years with the invention of strike indicators that resemble bobbers, fly fishing is starting to get this bad rap. It’s frowned upon to bring something that resembles the worm dunking beer drinker into the beauty of this sport. I fished with bobbers and worms as a kid, and my personal opinion is that this type of fishing is pretty boring. Fishing with strike indicators, however, is not boring. It’s a technical skill that has a lot of measurements and techniques to it, and it teaches you how to read a river better than any other type of fly fishing.
I understand how a fly fisherman with a strike indicator looks. It doesn’t look natural. It looks like you’re just watching this bobber float down the river and the moment that it moves you pull up on your rod there’s magically a fish on your line. If you fish nymphs, you’ll quickly learn that it’s just not that easy. There are so many variables at play that make it difficult. There are differing current speeds, obstructions on the bottom, differing water depths and of course, many opportunities to get tangled. The dry fly fisherman is known to be skillful and tactical, but I would argue that an efficient nymph fisherman is even more tactical. You see, the nymph fisherman needs to understand where the fish are holding and what their environment is like on the bottom of the river to be able to present these flies naturally to entice a fish.
The Setup
I know of 5 different ways to setup a “nymph rig”, and I’m sure there are several more ways that I don’t even know about. The setup that I’ll talk about involves using two flies, some split shot for weight, and a strike indicator. This is referred to as suspension nymphing. I’ll talk about two different type of strike indicators that I use.
The most basic suspension set up is starting with a 9’ 4x tapered fluorocarbon leader, although you could probably get away with a nylon leader. I like to cut off about 1 foot of the tapered leader, and I either attach 4x fluorocarbon tippet using a blood knot (or double surgeon’s knot) or a tippet ring. The tippet ring to me is the better stronghold and it allows me to easily attach new tippet if I keep cutting it back. The section of tippet that I add is generally 3 feet, so I like to have 12 feet of leader and tippet.
At this point, I will tie on my lead fly with an improved clinch knot, something bigger or heavier than my second fly. On the bend of that hook, I tie an 18 inch section of 4x or 5x fluorocarbon using a regular clinch knot and attach that tippet to my second fly, generally using something smaller or lighter than the first fly.
Depending on the speed and depth of the water, I determine how much (if any) split shot that I’ll attach about 6 to 8 inches above my first fly. I generally start with a smaller split shot, and then keep adding more if I’m not catching fish or hooking the bottom. You always hear people say if you’re not hooking up on bottom than you’re not going to catch fish. While this isn’t entirely true it’s the best way of knowing if your flies are in the “strike zone” if you don’t know the exact depth of the water.
For strike indicators, I generally fish with air-lock indicators or a New Zealand yarn indicator. It really depends on the type of water I’m fishing. If there are fast riffles and deeper water, I’ll generally fish an air-lock, but if it’s slow moving or shallower water, I’ll fish the New Zealand yarn indicator. I’ve read a bunch of times that you should set your indicator at 1 ½ times the depth of the water (if it’s 6 feet deep then your indicator should be 9 feet from your fly), and I generally stick to that rule to start, but end up moving it around until I’m at a height where I’m getting snagged or catching fish. If you haven’t noticed, I’ve talked about getting caught on the bottom a bunch and unfortunately that’s all part of nymphing. You lose flies, but it’s worth it because most of your biggest fish will come from nymphing, and it’s a tactic that you can use year round.
This is probably the easiest setup to learn on, but as you get better you can move on to tight line nymphing, commonly referred to as euro nymphing. I’ll be writing a blog post on this later in the season.
Techniques
So you’re all rigged up and you’ve got a nice stretch of water in front of you. Generally you want to nymph in the seam, which is the part of the river that’s in between some quicker water and the slower water that you’re standing in. The fish like to hang here because they don’t have to expend a lot of energy to hold, but they can dart in and out of the quicker water where the majority of food is floating past without draining their batteries.
When nymphing, you want to keep everything close to yourself because mending over several currents is inefficient and difficult. Instead of making “longer” casts, you want to move your body into the best positions. To start, I make a short roll cast to get my flies out in front of me and then I roll cast (keeping my indicator about one foot off the surface) my line upstream. There’s no need for traditional casting because you just need to get your line out there 10 – 20 feet upstream of you.
Your indicator hits the water upstream of you. Now what? It’s best if you point your rod tip right at your indicator and lift your elbow to be about level with your casting shoulder to keep all of your fly line off the water. This is referred to as “high sticking” and it’s important to do because you want all of the slack line out of your presentation. If your fly line is on the water, you can’t set the hook as quickly because you have too much slack. You want your hook sets to be quick and efficient. The minute that your indicator hits the water, a good tip for sinking your flies quickly is to point your rod tip up at about 1 o’clock (think of a clock) to get all of that slack out.
Your indicator is now floating downstream. You’ll want to keep your elbow up and continue to point your rod tip at your indicator. I like to point it just a little bit behind. You never want to have your rod tip too far upstream or too far downstream of your indicator because you’re creating drag, which is causes an unnatural presentation and results in catching less fish. I like to follow my indicator all the way until I’m at about a 45 degree angle downstream of me. At this point, my flies start to swing and I like to lower my rod tip down to the surface so that my flies come up in the water column like an emerging bug. A killer technique when you see caddis or mayflies hatching.
When your indicator moves, you NEED to set it, no matter what. The difference between a fish hitting your fly and catching up on a log is miniscule. Set the hook because these fish will just spit your fly right out if there’s no tension. The most important part of the hook set is making sure that you set the hook downstream of the fish. Fish point upstream when holding, so to seat the hook in their mouth you want to pull the line downstream.
I won’t go into details about reeling a fish in, but when you’ve got a bigger fish on you’ll want to reel in your line and let the reel do the work. On a smaller fish, you can use your line hand to strip in the fish. When their head is above water, now it’s time to net them head first. If you try to net a fish underwater, you’re likely to lose the battle and snap your line. Keep their head up and you’ll land that fish with ease!
Confidence Nymphs
I have some pictures below of three out of the size fly boxes that I use for nymphs. Most of these are standard patterns and I’ll drop some foot notes below each picture for flies that I use a lot and when I use them.
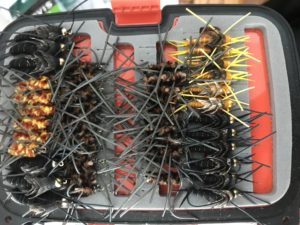
These are some of my stonefly patterns that I use. These are the usually the top fly that I’ll tie on as they have some non-lead wire that helps get them down a little quicker. These are a killer all season long. Rubber legs patterns have been a game changer for me over the past few years.
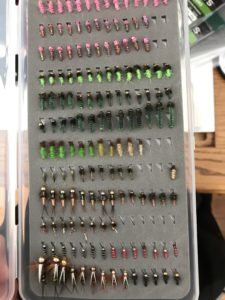
This box features a wide array of nymphs that imitate caddis, mayflies and midges. The pink nymphs in the second and third row are called Rainbow Warriors, and they’ve become really effective in the summer and fall when water levels have been low. The green caddis larva patterns are great in the spring. Just flip over several rocks in your river, and if you see some of these under the rocks then tie one on and have fun.
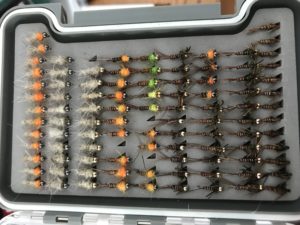
This box features some pheasant tail and hare’s ear patterns that have worked well for me. As much as I like the “hot collar” flies, I have just as much, if not more success on the traditional pheasant tails with no beads. It’s crazy, but I had a day last year where we couldn’t catch anything on bead head pheasant tails, so we switched to non-bead head. In the same spot, we started catching big brook trout like mad. I have no idea why this happened, but the moral is to keep switching flies if you’re in a spot that you know is holding fish!
Aaron Broaddus
